Showing posts with label delicious. Show all posts

Tuesday, November 11, 2014

Tuscan White Bean Soup

Ingredients:
2 Slices Bacon (1 diced 1 whole)
1 Shallot diced
¼ cup white Onion (use more shallot or whatever you like, this is just what I had on hand)
2 celery stocks diced
4 Cloves of Garlic diced
Salt/Pepper
4 Carrots diced
2 qts – reduced sodium Chicken Broth
Italian Seasoning
Red Chili Flakes
2 bay leaves
4 fresh basil leaves
2 cans – White
2 can Cannellini beans (white kidney beans)
1/3 container – Swanson's Cream Starter (optional)
Al Fresco - Sweet Italian Chicken Sausage (or any sausage you prefer but I highly recommend this kind)
3 cups roughly chopped spinach


Take one slice of bacon and diced up, sauté it in large stock pot with the following, adding and stirring each as you go, so they cook the right amount of time (I honestly just dice as I go), add diced shallot, white onion, celery, garlic, salt/pepper and 2 of the carrots, sauté until soft and browning slightly. Add in the 2 qts of Chicken Broth, Italian seasoning, 1 basil leaf diced, 2 bay leaves and Red Chili flakes, cook at a gentle boil for a few minutes, add one can Cannellini beans, cook for 5-10 minutes until everything is soft and tender.  


Remove bay leaves. Transfer soup to a large bowl. Add 1/3 of the soup at a time to the blender and blend until smooth. As batches are blended, return to big stock pot, continue cooking at a gentle boil. Add in the cream starter (not sure this was needed), stir until well combined. Add 2nd can of Cannellini beans.

In a separate sauté pan, add the 2nd slice of bacon whole, and the chicken sausage chopped up.  Brown the chicken sausage slightly, then add just the sausage to the soup. Finish cooking remaining slice of bacon, reserve for garnish. Add the remaining 2 carrots diced to the soup. Cook for about 5-7 minutes, once it’s all done, add in the fresh basil chopped, the spinach roughly chopped. Remove from heat. 

Garnish with the 2nd slice of bacon (or just eat it), and a little parmesan.  Serve with bread if desired – we had it with Rosemary Seasalt bread from Safeway – SO GOOD!

ENJOY! 
Ps. This was really an experiment and a combination of lots of different recipes online and a little of my crazy creative vision, but really came together into a lovely hearty soup my whole family loved! Adding it to our staples! Really inexpensive and comes together in about 1-1.5 hours depending on your speed at prep-work. Let me know what you think! 

Thursday, November 14, 2013

Simple Baked Chicken Recipe

I started making this a few months ago, and am constantly surprised how frequently people ask me for this super simple recipe. So here it is! All it takes two skinless chicken breasts, panko, eggs, olive oil and some seasonings. THATS IT! A simple delicious recipe that's always a hit with my family. Most importantly my 3 year old!

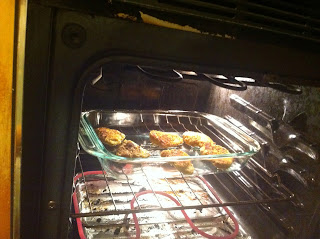
Step one: Preheat your oven to 350 with an empty glass/ceramic baking dish inside: 

 Take your two chicken breasts, trim off any fat & funky bits you don't want, then starting at the skinny end, slice it lengthwise so you get a nice even thin slice of chicken:

 Then slice them in smaller pieces so they are easy to work with, and portion out to your family. Two chicken breasts is perfect for my husband, daughter and myself. Actually surprises me how much we get out of these two small breasts!
 Pick whichever seasonings you like, I change it up now and again, but my families favorite is this blend of curry, garlic and lemon. Plus salt and pepper of course. But lots of combos work well, you can do italian seasoning, and even some shredded Italian cheese in the bread crumbs, or do it Mexican flavors, its pretty versatile! 
 Generously season your panko bread crumbs and eggs. I don't know if people usually season both, but I find it really helps! *Please note this is one egg, and about a cup of breadcrumbs. I could have used another 1/2 cup of bread crumbs to thoroughly coat the pieces but its what I had, and it worked out fine.  
On Medium heat, heat your large non-stick skillet, with a generous amount of olive oil. 
 It seems like a lot, but it really helps the panko brown up quickly before it goes into the oven, without over cooking your chicken on the inside. Since they are thin pieces, they cook pretty darn fast. 

Next do the typical egg, then breadcrumb dip onto the pieces. If you have fatter pieces (we are not all super great at knife work) then do those first so they can cook the longest. 


 Once you get them all in the pan let them cook til you can see golden brown edges and the chicken is turning white, almost to the halfway point.  

 These are not my best, but they worked well, flip them over, add a tiny bit more olive oil if necessary. You'll know pretty quickly if you need more olive oil, if your panko isn't browning and looks dry, add a tiny bit more. 

 Once they are nice and brown on each side, move them to the baking dish dish in the oven, and finish them in there. (I've also done this recipe in my cast iron) Takes about 5-10 minutes. I actually never time it, just finish the rest of my sidedishes, and when they are done, I take the chicken out.
 They have never been raw or overcooked, there's something magic about this recipe, its nearly fool-proof!

 Plate 3 pieces for the adults

  One for the tiny child, diced up for easy consumption.... 
Voila! Everyone is happy, and it was EASY PEASY! 
Try it tonight, its so simple you'll wish you'd found it before!

ENJOY!

Monday, February 11, 2013

White Sauce Lasagna, with Bacon, Veggies and Chicken

Hey!

Per your requests, here is the my version of the following recipe: http://thecozyapron.com/the-layers-of-six-cheese-lasagna-like-the-layers-of-life/ - Thanks to the author of that blog for such a great recipe, its a wonderful starting point, that you can run with in many different directions. However, with that said - I believe the original recipe would be amazing as well! I just was working with what I had on hand. :)

First thing I did was bake 5 slices of thick-cut bacon, that I seasoned a little prior to baking with a tiny bit of pepper and italian herbs - not sure if it was needed, but it tasted good so its worth trying.
Much more then 5 slices I think would be TOO much, as bacon is very heavy and assertive, if you use a different salted/pork product you may be able to get away with more.

Then I chopped up 1 chicken breast and 1/2 pack of mushrooms into small bites (about 1/4-1/2" chunks) you want them small so you get a little bit of each in every bite. I think I could have used a 2nd breast of chicken in mine, but I was making a VERY large batch in my 11x15" Pyrex. Lasted 3 days (could have lasted longer but my hubby kept having multiple servings each night!) with my 3 person family.

So once you have the chicken and mushrooms chopped up fairly small, saute them together (I used the bacon grease from the baked bacon for the fat to help it from sticking and impart more flavor) with Italian seasoning/herbs and pepper. Until JUST cooked, you don't want them to dry out. In cooking them together though it helps keep the chicken moist and not dry out, as well as impart a lot of flavor in both. Now remove them from the pan, reserving as much liquid as possible for later.

Chop up whatever veggies you intend to use, again keeping the pieces small so it incorporates throughout the lasagna, I used broccoli, cauliflower, and carrots (as well as the mushrooms listed above), as that's just what I had on hand. I used about 2 cups of each, and again I think I needed more in such a big lasagna - but it was tasty!

DON'T FORGET TO GET YOUR NOODLES GOING - I was so focused on the other ingrediants and the sauce that I honestly had everything ready to go before I realized I didn't even have water on the stove to boil! Now you can use the no-boil noodles to eliminate that problem, but I happen to like the texture of original lasagna noodles better... your call.

Gently cook the veggies in the reserved liquid from the meat/mushrooms, helps impart more flavor. (bacon, chicken, mushrooms, herbs.... all cooked into your veggies slightly... mmm).

Now for the sauce - the directions in the recipe link above is pretty much what I used, only I didn't have fresh basil or chicken paste so I just used the Italian seasoning and instead of only milk, I used a bit of chicken stock (low sodium). Because of the salt content in the cheeses used and bacon, you really don't want to add any more salt then needed.  I also added extra cheese, A LITTLE BIT of crumbled goat cheese (little goes a long way, don't go over-bored), mozzarella and parm. The lemon juice/zest is KEY - really helps break up all the heaviness of the cheese and bacon down the road. If you want to cut a little corners - I found adding jarred Alfredo sauce after the cheese sauce is done to help add more flavor and give you a bit more to work with was very effective.

Chop up the cooked/cooled bacon into small bits.

The rest of the assembly is pretty straight forward, just put a little of the sauce on the bottom of the baking dish. then noodles, then more sauce (you don't want dried out noodles, so keep them covered, but don't go crazy - cause you'll need a good deal of sauce at the top.) then chicken/mushroom mixture, veggies, bacon, sliced/grated mozzarella, goat cheese (again keep this part light), and ricotta in small bits. more noodles and repeat. Be sure to reserve a good amount of sauce for the top, you REALLY don't want it to dry out. more cheese, a little parm, pepper, herbs if you want and bake at 400 for 30 minutes or until bubbly & slightly browned! (*Tip from the other recipe is the put a foil lined baking sheet under your pyrex, to catch any spill over - helped a lot)


Like I said before, you could probably put just about anything in here veggie wise, or pork product wise. Other meat isn't really needed, my 2 year old just LOVES chicken and is hesitant on veggies and cheese, so I wanted to give her something she could get into. It was a huge hit for the whole family, and with a bit more veggies in it next time, it would be a great, slightly indulgent way to feed the family a nice semi-healthy dinner.

Hope you enjoy!


Thursday, January 17, 2013

382 Calorie Pasta Primavera Dish!

I love me some pasta, but its always "OFF THE MENU" when I'm dieting, until now! Last night I invented a new dish that not only was big on flavor, and had yummy pasta in it, it was also super healthy and low calorie. I had to share! Its filling, and even a pretty big portion for "health food".

Not the best pic, but trust me - it was SOO good. I snapped the pic quickly because I was starving, but it will work for this recipe.

What you need:
Angel hair Pasta (just a little)
Drizzle of Olive Oil
1/3 of an Yellow Onion
1 small carrot
2 cloves garlic
4-5 mushrooms
1 small Zucchini
about 1/2-1 cup Broccoli
Tablespoon of butter (or less)
1/2 - 1 Tablespoon of Lemon Juice (I like lemon flavor so I used a lot)
Greek Seasoning
Sprinkle of reduced fat Feta Cheese

Boil water, cook a small patch of Angel Hair pasta as directed. I used about the thickness of my finger worth of pasta, really don't need much cause the veggies fill it in, plus its just empty calories (delicious empty calories) anyway.

While that's doing its thing take a TINY drizzle of olive oil and saute up some yellow onions (these do have a kind of high calorie count FYI, so if you aren't into onions - skip them and its still will be good and it will save you about 30 calories. Then add chopped up carrots, then garlic, then mushrooms, then broccoli, then zucchini, saute for about 5-7 minutes total, checking doneness (about as long as it will take for you noodles to cook. Add the butter, and lemon juice and greek seasoning (salt/pepper good too).  Add the done pasta to the skillet and toss it all together.

Put on your plate, sprinkle the bit of feta cheese on top (helps you forget about Parmesan, and its consistent with the Greek seasonings used) You can change this up and use all sorts of veggies, and seasonings. But keep it light, simple and delicious! Just weigh your food and make sure you pay attention to calories.

If you can splurge, meat would be great in this too - especially shrimp! Chicken or whatever you like!

ENJOY!
xoxo

Kela

Thursday, August 16, 2012

Zucchini/Blueberry/Oat Muffins - Only 140 Calories per Muffin!

Hey Everyone,

Its been a while, but here is another yummy, low-calorie recipe for you!

I love Zucchini bread, and I love Blueberry/Oat Muffins, so I figured, why not put it all together, get a lot of your food groups, and a tasty treat, plus something to help get your kids to eat veggies without even knowing it!

Here is the breakdown:


Started off by buying 1 &1/2 cups of Rolled-oats at Whole Foods, pulsing them in my blender for a minute it they were semi powder, semi granulated, semi oaty. Added them to 1 cup of milk. Add a bit of cinnamon/nutmeg/allspice and orange zest and let sit for 30 minutes. Softens up the oats and thickens up a bit.

In another bowl add the brown sugar and the white sugar, the eggs (1 whole and 1 just white), vanilla, applesauce, oil and grated zucchini and mix until well incorporated.

In YET another bowl mix dry ingredients: flour, more cinnamon, nutmeg, all-spice, baking powder, and baking soda, and whisk.

Mix Oat mixture and Zucchini mixture together, and slowly incorporate the dry ingredients. Line muffin pan with liners and lightly spray with baking spray. (may not be ness).

Bake at 400 degrees for about 20-22 minutes!

VOILA! Delicious, nutritious and low calorie goodies for you and the whole family!

ENJOY!
Thanks for reading!
-Kela

Thursday, July 5, 2012

Reese's Peanut Butter Cup inspired Cake!

Recently I was asked to create a birthday cake for my father in-law and after thinking about the man at great length, I came up with this idea: A Birthday Cake that looks, tastes and feels like a Reese's Peanutbutter Cup!

Not being a super savvy baker - I started off with some boxed items and tinkered a bit to get personalized and where I wanted it to be.

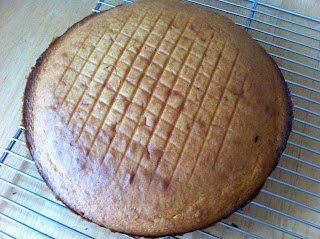
Basically I took these boxed cake mixes cooking them as directed except in place of the oil I put in a blend of crunchy and creamy peanut butter, I had to add a tiny bit of vegetable oil to make it blend.

I was surprised how well it worked, the cakes came out light, fluffy, with a nice hint of peanut-butter. If I could say anything, I wish it could taste MORE like peanut-butter. But more will be coming into the recipe so just wait. I added the peanut-butter to both the yellow and chocolate cake.

Now for the fun part - while these cakes are cooling - make your chocolate ganache! I thought ganache would be hard to make, but after finding this recipe: http://allrecipes.com/recipe/chocolate-ganache/ (minus the rum cause that would be weird in a Reese's cake) I realized not only is is super easy, its fun and amazingly delicious!
I used the Ghirardelli Semi-Sweet chocolate chips, and heavy whipping cream as directed, if you melt the chocolate first and add the heavy cream to that, it will seize up a bit and take longer to incorporate, so I really recommend following the directions exactly adding the warm cream to the cold chips, works like a champ! And frankly its easier that way anyway! Now I didn't do this, but I might recommend adding a little bit of PB to this mix too, just to really cement home that PB & Chocolate flavor.

Next I made a peanut butter and chocolate chip ganache - same recipe as above, just use the pb/chocolate chip package shown below (or one like it). I also added fresh pb as well, makes it a little softer and spreadable which is nice when icing a cake.
At this point you can do one of two things. You can use the warm ganache as a dippy sauce - its quite possibly the most delicious liquid ever created. Creates a shiny, amazing topping to cupcakes or fruit or whatever.
Just dip it in and let it set (if you cool it, it becomes a sort of hard chocolate shell, or eat it warm, both are tasty!)
Or you can put the bowl of warm ganache to the side, and let it cool a bit, then whip it up and use it as a frosting. 
Slice your chocolate cake in half, and trim the peanut-butter cake so you have a nice flat surface:
Spread on the peanut butter and chocolate ganache generously as you layer:
Then to get it to look more like a Reese's Cup - trim up the sides at an angle. Now I did mention that my baking skills are not spectacular so know that you can do this, and you may even do it better then I did! 
Used the whipped up Semi-Sweet chocolate ganache as frosting and do a nice even coat around the whole thing. Smoothing it out the best you can. keep in mind as its out to the air it will dry, and get harder to work with, so move quickly - also if you put it in the fridge or cool it TOO much it will also firm up quicker then you might like. I had put mine in the fridge in hopes to get it fluffier, but it sort of separated slightly, so just FYI.
And no that isn't some weird naked chick behind the cake, its my sister in a nude colored shirt, didn't even realize she was in the shot til later, and decided it was artistic and fun, so enjoy that. 
The last step is to pipe a bit of decoration around the cake using the peanut-butter and chocolate ganache, to simulate the Reese's look. My piping skills are even worse then my baking skills, but I think it came off looking pretty good!
And there you go! A Reese's Inspired Cake! :D
ENJOY!

Saturday, June 2, 2012

Death By Garlic Bread - For a splurge!

I know it's super unhealthy, but sometimes you just got to have a big Italian dinner and say to hell with it! At least I do. :) I have a pretty intense recipe for garlic bread that is a HUGE family favorite, so I thought I should share. It is really garlicy, but more then just that, its herby, buttery, cheesey, and not soggy!

Here's how I do it:
Take french bread, and cut into nice servable sized slices for garlic bread. Sprinkle with a little Parmesan and pepper. The Parmesan will help to absorb the butter so it doesn't make the bread soggy, plus add a salty element.  Place on an oven safe dish. I used a glass pyrex casserole dish as it keeps them upright with the sides, but as long as you cut it pretty straight it should be fine.
 In a saucepan melt one stick of unsalted butter over low heat, just want it to gently melt. When it is all melty, add an obscene amount of garlic, I used about 2 whole garlic balbs, probably like 15+ cloves, you really can't make too much! Add some fresh chopped basil, a little pepper, a tiny bit of red chili flakes are optional if you want a little more spice, but trust me the garlic will be a bit spicy on its own. Don't cook it long, just a minute or so to bring it all together, it will cook a little in the oven, and if you over do it, it will come out less flavorful.
 I used a tablespoon to carefully get nice spoonfuls of mostly garlic/herb leaving much of the butter in the pan, as to not immediately soggy the bread. Remember the Parmesan will help with that too, but only if you hurry to get it in the oven.  Once you've gotten a good amount of the garlic/herb mix onto the bread, drizzle each slice with a bit of the left over butter.
 Put in the oven on broil and for 5 minutes or until lightly brown and has come together happily.  Let cool for a minute or two before serving.  Best while its still pretty hot though.
 Serve with your favorite italian dinner, here it is with my homemade turkey spaghetti, a Caesar salad and some yummy Pinot!
Remember it's not super healthy to eat like this all the time, but once in a while is good for the soul. ;)

Hope you enjoy!
Kela

Monday, October 31, 2011

Fancy Margarita Pizza - 144 Calories A Slice!

I was feeling uninspired the other day so I asked my facebook friends to throw out ideas of things I could make for dinner, keeping in mind I am dieting.  Within a few minutes, several people posted "Pizza" to which I rolled my eyes, and laughed.  Pizza is not diet food!  Then it dawned on me, what if I could make naughty favorites, taste good, AND BE GOOD FOR YOU?  I was on a mission.

Here is my recipe for Fancy Margarita Pizza, where a slice is only 144 calories, you can have 2-3 slices at dinner, maybe even a salad and still be in a good place calorie intake wise, plus big flavor and so easy to make!

My local WholeFoods offers fresh pizza dough you can buy 11oz for under $2, and thats enough for a whole pizza.  I've purchased it before, but the regular dough is kinda high in calories, so I tried their Wheat pizza dough.  For the whole pizza dough its 660 calories, then you got toppings.

 I love margarita pizza's but I always want to add a bit extra flavors... this time my toppings were Garlic, Onion, Mushrooms, Spinach, Tomato, Basil, Mozzarella and Goat cheese!
 The fresh pizza dough is a little tricky to get out on the pan anyway, but I did notice the wheat is even more sticky, so make sure you put a TINY pit of olive oil on the bottom on the pan, to help loosen it up.  Just stretch and pull gently until it fills the pizza  pan.
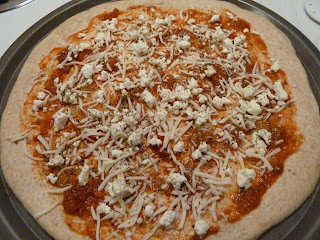
 Top with Ragu spaghetti sauce (I just had some left over), 1/4 cup of mozzarella, and a little less then a 1/4 cup of goat cheese. (save a little for the top)
 Add tomato, mushrooms, basil, spinach, garlic, onion...
 and then 1/4 more of mozzarella and the rest of the 1/4 of goat cheese (honestly this was a little heavy on the goat cheese, tasted good, but I think a little less would be good too, and then LESS calories! I really like putting a light coating of olive oil on the crust before baking - I think it really helps get it a nice texture and color. 
 Bake at 375 for approx 20-30 minutes (whenever it's melty and toasted)
 And voila - super flavorful, super easy pizza for under 150 calories a slice!!!!
Who said that pizza wasn't healthy!?


Ingredients: (calories per 2 slices)
Fresh Wheat Pizza Dough (165)
Ragu Spaghetti Sauce (11) (I believe I used 1/2 cup on the whole pizza, really don't need a ton)
Mozzarella (40)
Goat Cheese (20)
Olive Oil (15 for 0.13 tbsp) - seriously use as little as possible, olive oil is tasty, but SUPER HIGH IN CALORIES!
Garlic (2) (used about 2-3 cloves on the whole pizza)
Red Onion (1 tbsp = 4 calories)
Basil leaves (1 tbsp chopped = 1 calorie)
Mushrooms (13 calories)
Roma Tomato (13 calories)
Spinach (2 calories)

ENJOY!

Ps. I plan on coming up with some pizza recipes that involve meat and other flavors as well, I'll keep ya'll posted!